Mar 31, 2009

Add ARM to Dell Inspiron Mini 9 Part 2

Add ARM to Dell Inspiron Mini 9 Part 2


Step 3: Insert Your New DIMM


To insert your new DIMM:
Pick up the DIMM and turn it so the teeth are facing the DIMM slot and the indentation is closest to the left side of the system (the SSD chip). On most DIMM modules, this means the sticker will be face up.
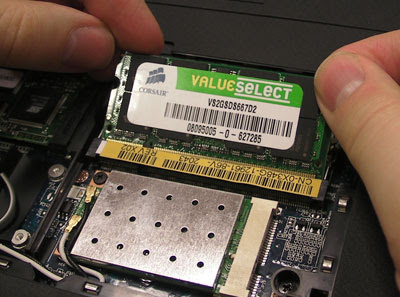


Insert the DIMM at a 45 degree angle, pushing until it snaps into place and the metal retaining clips clasp into the grooves on either side of the module.


Step 4: Close and Test Your Computer
Now that you've inserted your new DIMM, it's time to close up the Inspiron Mini's chassis and turn on the computer to make sure your RAM is recognized by the system.
Snap the hatch back into place.
Tighten both screws.
Power on the computer. If the computer fails to boot (particulary if you hear a beeping noise), remove the battery to kill the power and open up the chassis again. Your new DIMM is either not fully seated in the slot or it's the wrong kind of RAM.
Hit the 2 Key right away to enter the BIOS. The BIOS screen will display the amount of RAM you have now so you can see whether it's showing the proper amount.


Add ARM to Dell Inspiron Mini 9 Part 1

Mar 29, 2009

Add ARM to Dell Inspiron Mini 9

Add ARM to Dell Inspiron Mini 9
With the introduction of the Inspiron Mini 9, Dell has made it very easy for users to replace the system's default memory module with a higher-capacity unit. All you need to make the change are a mini philip's head screwdriver and a DDR2 PC5300 SODIMM in either 1GB or 2GB capacity.

It's important to note that the Inspiron Mini has only one DIMM slot so you will have to remove the existing 512MB or 1GB DIMM that comes preinstalled.

Note: To avoid static damage, always ground yourself before working on the inside of a computer.

Step 1: Open Upgrade Hatch


Unlike some other netbooks (see the MSI Wind), the Inspiron Mini has a hatch that provides easy access to its memory slot. To get to the memory slot:
Turn the Inspiron Mini over so the bottom is facing up.
Unscrew both screws.


Pry off the hatch gently and place it to the side.


Step 2: Remove Original DIMM


Because the Dell Inspiron Mini has only one DIMM slot, you'll need to remove the preinstalled RAM stick before you can add one of your own.
To remove the existing RAM:
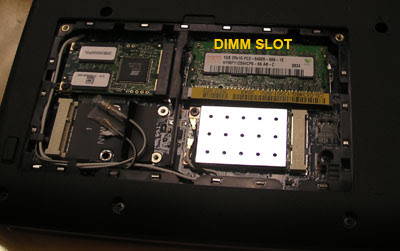
Locate the DIMM slot. If you've never installed RAM before, the DIMM is in the upper right corner of the exposed area as shown below.


Gently pull the retaining clips holding the presintalled DIMM in place until the module pops loose

Lift the old DIMM up and place it to the side. You won't need it anymore

Mar 27, 2009

Install Vista on Dell Mini 9 (USB) Part 2

Install Vista on Dell Mini 9 (USB) Part 2

The informations about install vista on dell mini 9 is continue...

To see Part 1 about Install Vista on Dell Mini 9 ( USB ) Part 1 Here http://shopbatt.blogspot.com/2009/03/install-vista-on-dell-mini-9-usb.html


Tablet PC is useless to me since the dell Mini 9 netbook has no touch screen so that’s 391MB saved. System Restore isn’t a big install in itself, but the feature uses a lot of space as I’ve said before. I use WinRAR so I don’t need Zip Folder.

As you can see, I saved 5GB by removing the features I really wouldn’t use anyway. I’m not even losing performance or features! Go vLite!

10. Click next, and you may get warnings about certain disabled features being required by other enabled features. In my case it was about Windows Media Player and a few other utilities requiring the Windows Media Codecs. I’m installing a codec pack so I just said No.


11. The next section provides some tweaks to customize your Vista experience. I set UAC to Disabled since that’s the first thing I do when I install Vista anyway. In the System tab I disabled Hibernation since the solid state drive is fast enough to not require that kind of performance. The system is so low power anyway that Standby will last quite a while. Hibernation just takes up extra disk space. The rest of the options are personal preference and shouldn’t affect install size. Hit Next when you are done.

12. This last stage is for performing Unattended installs, or using the features that automatically select the options that the install would otherwise prompt you for. Fill this out at your discretion.
13. You can now hit Apply to start the “scrubbing”. You may get the same prompt from step 10 about dependent features and you can give the same response here as you did then.


14. A pop up will ask which version of Vista you would like to rebuild. To save on install size just choose the one you plan on using. I am using Vista Ultimate 32-bit, so I chose Rebuild one (Ultimate)


15. Press OK, and away vLite goes! Since I didn’t integrate any hotfixes and only really stripped data out of the install, the process only took about 25 minutes.


16. Once it finishes you can hit Finish, and the program will close. Check out how big the Vista installation folder is on your hard drive. I bet it’s a lot smaller than the original files!

Step 3 - Transfer Vista Install Files to USB Flash Drive
This is a pretty short step, and probably doesn’t even require an entire step anyway. But, if you didn’t do step 2, you need a nice home to land, so here you are:

If you did follow step 2, copy the contents of your Vista installation folder to your freshly formatted flash drive
If you didn’t follow step 2, copy the contents of your Vista installation media (DVD/CD/ISO) to your freshly formatted flash drive
When your copy completes you can close all windows looking at the flash drive and use the Safely Remove Hardware feature to remove the drive.


Step 4 - Install Windows Vista from USB Flash Drive


1. With the Mini 9 powered off insert the flash drive into any of the available USB ports and turn the Mini 9 on
2. When the Dell symbol pops up hit the number ‘0′ to load the Boot Menu
3. Choose USB Storage and press Enter; the Vista installation should begin!
4. Depending on what you selected in vLite’s Unattended Install section (if anything) you’ll get various prompts during the install process. Proceed according to a normal Vista installation. The only prompt that may be confusing is the drive/partition configuration stage. Because of the small size of the hard drives in these netbooks I doubt anyone will be wanting to dual-boot. Here are the steps for wiping the drive and installing just Vista:


1. Select the only Disk/Partition that should be listed
2. Click the Advanced options link
3. Select Delete
4. Click OK to confirm the pop up
5. You should only have Disk 0 Unallocated Space listed, so click Next (don’t bother creating a new partition, the install will now do it automatically


5. So begins the actual install. Copying files will take about 2 minutes, expanding files will take about 15 minutes, and the rest (including a few restarts) can take up to an hour. Mine sat at Completing Installation for a long time when I ran the vLite stripped version, but I don’t think that’s normal.


Here is a screenshot of my 16GB drive’s space usage. Does this convince anyone that stripping Vista down is useful?


Step 5 - Initial Setup
When you first create your account and log into Vista it may immediately restart, but this is just Vista installing some final features, so don’t worry about it. The first thing you’ll notice is that your screen resolution probably looks wrong; this is because your graphics drivers probably aren’t installed. No matter, what we really need to do is install one of the Mini 9’s network connection drivers, and most of the rest will fall into place via Windows Update. I have found the drivers for both the ethernet and the wireless cards (at least on my machine, I don’t know if they have different models) so you can use your flash card to transfer them from another computer. Please use the manufacturer’s links if you can help it.

Ethernet - Realtek
Realtek Links - Site 1, Site 2, Site 3
Local Mirror - Install_Vista_6213_1119.zip

Wireless - Arcadyne Wireless LAN
Dell Link - R197390.EXE
Local Mirror - R197390.EXE

I would recommend starting with the Realtek drivers. The install I have listed above will detect your card and install the drivers for it automatically. It makes life very simple. (I did have a problem during one of my installs where the Realtek installer complained of an XCopy problem. To solve this, I downloaded just the driver without the installer from Site 1, Site 2, or Site 3. You can then go into device manager, right-click the Ethernet Controller, and select Update Drivers. Choose to Browse on your local hard drive and find the folder you extracted the drivers to.)

Once you have your network controllers set up you can go ahead and run Windows Update. You may need to install a Windows Update update (sheesh, don’t ever use that phrase in normal conversation), and Windows Update kepy on closing itself for me. I suspect it was the update installing, but eventually Windows Update will actually find a list of updates. Make sure you click View Available Updates and check the different hardware drivers in addition to the regular updates. Drivers that mine found were:

Intel Display
Creative Webcam
After all of these updates are installed (and you restart your machine if necessary) we will need to install the last few drivers that Windows Update didn’t find.


First, we’ll want to install Dell’s battery meter software. You don’t actually need the software, so you can uninstall it immediately afterwards. All we need is the driver is installs and leaves on your machine. Go ahead and download it here. After installing restart the computer and uninstall the Battery Meter software if you wish.

I had an issue with getting an error about Windows Media Player crashing all the time. This is probably due to the vLite strip, and the fix I found was to copy this dll into C:\Windows\System32 and then running C:\Program Files\Windows Media Player\wmplayer.exe.

After this you should only have two unknown devices in Device Manager, both called Base System Device. Dell’s JMicron driver will take care of these.

Conclusion
And that’s it, folks! Your Device Manager should be free of unknown devices, and your Dell Mini 9 is ready for the Vista Life! Please post any concerns or suggestions. I hope this guide helps people.

Related Blog Thread :

Instal Vista On Dell Mini 9 ( USB ) Part 1

Informations from : Install Vista on Dell Mini 9 (USB)

Mar 26, 2009

Install Vista on Dell Mini 9 (USB)

Install Vista on Dell Mini 9 (USB)

Introduction :

I recently bought a prink Dell Mini 9 netbooks. ( Informations on blog My cute Dell Inspiron Mini 9 Netbook ) . As a newbie, I found some informations about how to install vista on dell mini 9 netbook. If some one who is just looking for the informations, follow me...

Required

Dell Mini 9 (duh)
Another computer with a Windows operating system (preferably Vista)
USB Flash drive (at least 2GB, although that’s assuming you are stripping the install with vLite…if not you’ll need a 4GB drive) If enough people express interest in an alternative method I will write a guide for installing Vista over the network. Flash drive prices are plummeting with the growing popularity flash chips (due mostly to solid state drives) so a 4GB drive isn’t all that expensive anymore. Still, network installs can be easier if set up correctly and are a damn fun accomplishment to have under your belt.
Windows Vista CD/DVD/ISO
vLite (optional)

Step 1 - Prepare USB Flash Drive

1. Insert the flash drive into your Windows machine and back up anything from the flash drive that you wanted to keep. We’re going to reformat it.
2. Open up a command prompt.
3. Type diskpart and press Enter. After a second you should have the prompt DISKPART>
4. Type list disk. A list of your connected hard drives will appear. Make sure you see your flash drive on the list. In the example below my 4GB flash drive is Disk 2.


5. Type select disk 2 but change the disk number to whatever your drive is. Make sure you get this right. If you continue with these steps on the wrong disk you’ll end up erasing all of that drive’s contents. Be careful.
6. Type clean. It should only take a few seconds to clean.
7. Now type create partition primary. This command should complete almost immediately.
8. Type select partition 1
9. Type active
10. Type format fs=fat32 to format the flash drive. This took about 6 minutes on my drive.
11. Lastly, type assign and then exit
12. Format complete! You can close the command prompt


Step 2 - Reduce Vista Installation (Optional)

The Dell Mini 9 comes with a solid state harddrive which is a blessing and a curse. On the plus side you get better read/write/seek speeds, improved battery life, and better shock protection than rotating platter hard drives. Unfortunately it’s still an expensive technology, and the price-per-gig of solid state drives is much higher. The Mini 9s come with a 4GB, 8GB, 16GB, and now even a 32GB drive. I have the 16GB drive and you definitely want as much space as you can get with this smaller drives. The software vLite will take Vista Install media and provide tons of customization and stripping options. You can skip this step and go straight to loading Vista on the flash drive, but I would highly recommend it.

These instructions cover the process I followed. I would definitely like to develop this process to obtain the smallest install size possible, though, so please post any tips you come across and I’ll keep checking the dellmini9 blog for more useful tidbits.


1. Download and install vLite v1.2 Final
2. vLite requires the WAIK to run, but after installing it and restarting vLite still said that I needed it. The fix for me was to download the Windows Imaging Driver and extract the three files into the vLite Program Files directory. For more vLite installation help please visit their forum and post your situation in the comments here. If there is a common problem I’ll add the solution to the guide.
3. Insert your Vista DVD/CD or mount your Vista ISO. I used an ISO but the steps should be the same. (Make sure you have at least 4-5GB of space on your computer.)
4. Load up vLite and browse to your disk drive with the Vista installation media
5. vLite will ask you where to put the files on your hard drive to modify them. Create a directory wherever is easiest for you. I chose C:\vista


6. After you click OK vLite will proceed to copy all of the files from the Vista installation media to your hard drive. This will take a few minutes. After copying the files vLite will analyze your install quickly and show you it’s information. Go ahead and read that if you want and then press Next
7. vLite will give you a list of Tasks that it can run on your Vista install files. Since this guide is meant for decreasing the install size I will only focus on Components, Tweaks, and Unattended setup, since these Tasks will let you strip the install to the bare minimum. Check those three Tasks. Integration is always something interesting to look into as you can slipstream service packs and updates into your install, but since it means a bigger initial install we’ll ignore it for now. We don’t need to create a Bootable ISO since we will just be copying these files to the flash drive instead of burning a CD/DVD, so we’ll ignore that too. Go ahead and click next.
8. The next screen will have a pop up asking what features or applications that you plan to use. This will be up to you but this is the configuration I used:


I didn’t check anything in the Applications tab so I didn’t bother posting a screenshot. As far as I know this tab merely checks the programs on your current machine that rely on Vista system files so that you don’t remove something that those programs really need. Since this install isn’t even meant for this computer anyway I found no use for this tab.
I intentionally left System Restore off because it uses so much space. With a 16GB hard drive (or less) I’m not too worried about losing anything. It’s not meant to be a main machine. I don’t need it wasting precious space just duplicating my data in a backup.


9. Click OK and you will now be able to further customize the install by choosing components to remove. This is also up to your preferred configuration, but I will post mine:


I removed Speech Support because never once have I felt the urge to “talk” my computer through anything. That’s just 450MB of wasted space to me.


I removed all display adapters except for Intel’s since I know the Mini 9 has an Intel chip. I have done the install without scrubbing with vLite, however, and the disk didn’t have the drivers. I had to download them through Windows Update anyway so you can probably even remove those as well, but just to be safe I included them.

I removed the Ethernet and modem drivers since I know that my Vista disk doesn’t have them anyway. Rather than installing all of those space-hogging drivers I’d rather just have Windows Update download and install just the ones it needs.

The other drivers are wasted space since the Mini 9 doesn’t even have any of this hardware anyway. If you hook up a scanner or printer in the future Windows Update will just download the appropriate driver anyway. You can save about 800MB of space by doing this (printer drivers alone take up 700MB).


Again, the things I checked were for hardware I knew I wouldn’t need or use. I kept the networking hardware features since the Mini 9 will stress a lot of network usage since it’s so small and low capacity.
I checked the entire Languages section. You save an entire 1.1GB by doing this. I never need other languages but if worst comes to worst they are very easy to install from Windows Update later.


I removed all codecs since I’ll be installing the K-lite Mega Codec Pack which has all of them. I have always hated the sample movies, pictures, and music so I removed those, and I don’t plan on editing movies on the Mini 9 so goodbye Movie Maker. I much prefer XBMC to Media Center so that’s gone too.
All I removed in the Network section was Windows Mail. Like I mentioned above, I’ll be needing as many network features as possible, so I was pretty lenient with this. Plus, the file size for this entire section is only 151MB. I left the Services section completely alone. I didn’t want to disable something that I would end up needing later, and this section is only 155MB. Feel free to remove service at your leisure but your mileage may vary.


I’ve never found Windows Help useful, so goodbye. Since I already disabled Speech, the 550MB of Natural Language support is useless. The rest is personal preference to remove small features.


To see more Install Vista on Dell Min 9 ( USB ) Part 2 >>>

Mar 23, 2009

My cute Dell Inspiron Mini 9 Netbook

Last Week, I bought a cute dell inspiron mini 9 laptop from the market. The pink surface and its smooth skin makes me so crazy.


At first, Let'e see some pitures about my
inspiron mini 9 netbook.


I also love the tristan eaton stickers blue one. The color makes the dell mini 9 more fashionable.


So hard to make a decision.

But at last, I bought the pink one. becasue it fits my hello kitty who lie on the table in bedroom.
Wowoo...
A very incomprehensible reson ??
I think ... the descision which made by a girl always incomprehensible.


Find mini 9 netbook specs on www.shopbatt.com/blog/laptop-review/dell-inspiron-min-9-spec-review.html